My Go-To Stack for Web Apps in 2021: Spring Boot, React, Postgres, Docker Compose
My current default boilerplate for building web apps: Spring, React, Postgres and Docker Compose on a raw VM
Inspired by Sam Texas’ blog post “Docker, Django, Traefik, and IntercoolerJS is My Go-To Stack for Building a SaaS in 2021” and the accompanied Hacker News thread I decided to write my own version. Not because I think my approach is better (frankly, it’s very similar) but because it’s fun and it will be interesting looking back at it in 5 years.
What I’ll describe below is a stack that I am personally comfortable with and which to me strikes a pretty good balance between budget, ease-of-use and productivity. But as HN user ssijak points out nicely in the linked HN thread:
Goto stack for building SaaS is the one you know the best.
With that being said, let’s get started. This is my stack for 2021:
- Spring Boot backend
- React in case of SPA
- PostgreSQL as database
- Docker Compose as deployment platform
- Nginx as reverse proxy
- Hetzner Cloud for hosting
- Ansible for infrastructure automation
- Github actions for CI/CD
Application Level
Spring Boot
Spring Boot is my go-to backend technology for the simple reason that it allows me to get stuff done. With Spring Boot, it feels like the only code you write is business logic. There’s barely any glue code or plumbing, you just fill in the gaps, everything else is taken care of. Working with Spring makes you realize how much time you wasted reinventing the wheel and writing code that brings absolutely zero value.
What Spring is for me is Django or Ruby on Rails for others. Ultimately, which one you pick doesn’t really matter. At this point it’s more of a cultural thing: If you started your career in California you’d probably be more inclined to pick Rails but I grew up in Europe, where Spring is more commonplace. In terms of features, they’re equivalent as far as I’m concerned.
Now, a few things need to be said about Java. Java still has its shortcomings but it has been making great strides in the right direction:
- Verbosity: When people think of Java they think of unnecessary boilerplate. I’m happy to announce that those days are gone: Project Lombok removes a large part of Java’s inherent verbosity. Also, with every language iteration more and more quality of life improvements are added: type inference via
varkeyword and record classes are just two examples. - Asynchronous programming and concurrency: What has irked me for a long time is Java’s subpar support for asynchronous programming - but that has been taken care of as well thanks to projects such as Reactive Extensions and Project Reactor. Hell, we’ll even get true fibers with Project Loom in the near future.
- Heavy weight: Sure, the JVM is still heavy. An idle Spring app takes 200 - 300 MB of RAM. And I acknowledge that this might be a deal breaker for some but IMO the productivity gains are more than worth it. Let’s also not forget that the JVM is an incredibly powerful piece of technology, so when you need the power you have it at your fingertips.
Like it or not, Java is as relevant as ever and it will stay that way for many more years.
React Frontend
I firmly believe that SPAs are vastly overused and that in many cases you can get away with simple server-side rendering. But I’m not one of those who reject SPAs out of principle. For applications that are heavy on the interaction side I currently go with React. This choice has nothing to do with me being a flaming React fanboy (far from it) but again, with how comfortable I am working with it. I just so happened to be doing some work with React in previous projects and was able to gain a decent grasp of it in the process. React has long surpassed the point where I would call it “mature” and the documentation and community support is superb. For someone who’s primarily a backend developer and who does some frontend work because it needs to be done that’s all I could ever ask for.
I store my frontend code alongside the backend code in a mono repo and serve the static files from Spring’s embedded Tomcat Webserver. I really like being able to deploy frontend and backend in one go.
PostgreSQL
I think nothing really needs to be said about Postgres. It’s just a no-brainer. When I look back at previous projects Postgres has been the technology that throughout caused the least amount of trouble - by far. You spin it up and it simply does what it’s supposed to do. A certain degree of SQL knowledge is required of course and it doesn’t hurt to know the SQL tuning basics: indexing, denormalization, materialized views, EXPLAIN ANALYZE, etc… But in most cases you won’t even get into the situation where you need to optimize it.
In addition, Postgres makes for a great task queue for asynchronous workloads. No need to introduce Redis, just use your existing Postgres with FOR UPDATE SKIP LOCKED.
Logging / Monitoring
Logging and monitoring is the only real pain point in my set up. Self-hosting an ELK stack is not really viable and lighter-weight alternatives are few and far between. So far, I had to resort to grepping raw logs from the containers which works alright (grep stronk!!1 💪) but if you have a better idea, please let me know! I’m currently contemplating sending all logs over to AWS Cloudwatch via Docker log driver although I’m really not a fan of the product itself, but hey, it’s super cheap.
Infrastructure Level
Docker Compose as deployment platform
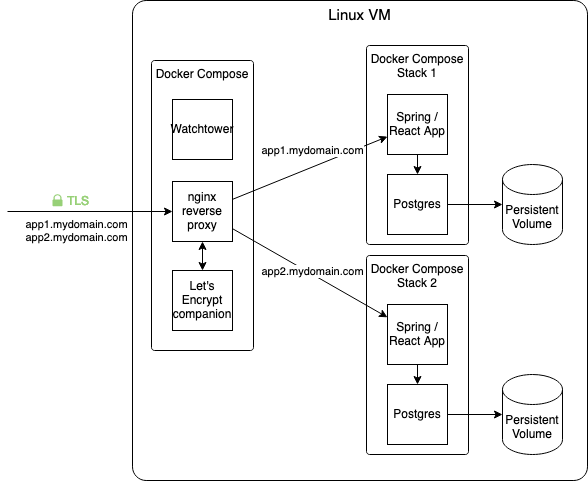
For simple projects and early stage startups Docker Compose really is enough. If you only need to run a handful of containers and you don’t have crazy scaling requirements (most applications don’t) there’s no need to bother with Kubernetes. Did you know that you can scale containers in and out with Docker Compose? With some tricks you can even achieve rolling updates! Anyway, my boilerplate Docker Compose stack consists of the following containers:
- Nginx proxy: Unsurprisingly, this container runs an nginx reverse proxy. The cool thing about it is that it listens on the Docker socket for newly created containers. If a new container has the
VIRTUAL_HOSTenvironment variable set the proxy will automatically create a route to that container using the specified virtual host. When I want to host another application, I just spin up the container withVIRTUAL_HOSTvalue set to e.g. “myapp.mydomain.com” and seconds later I can reach the application on myapp.mydomain.com. - Let’s Encrypt proxy companion: A container running alongside the nginx proxy that automatically issues and renews Let’s Encrypt certificates for the specified virtual hosts.
- Watchtower: Watchtower regularly checks whether an updated image is available for any of your running containers, and if so performs a (rolling) update. Automatic updates can be turned off for individual containers that you don’t want to randomly restart, like the database.
Hetzner Cloud for hosting
My Docker Compose stacks typically run on an ordinary Linux VM on Hetzner Cloud but any hosting provider suffices really. The reason I’m choosing Hetzner over Digital Ocean or Linode is its truly thrifty™ pricing. 2.96€/mo for 1 vCPU / 2 GB RAM / 20 GB disk, it doesn’t get cheaper than that.
Ansible for infrastructure automation
For some reason, Ansible has always scared me. Maybe because when you’re dealing with Ansible you’re leaving the nice and cozy, cotton candy developer world and enter the murky, obscure realm of die-hard Linux system administration. Ansible is one of the tools that I never understood what its good for and what exactly the difference is to Chef and Puppet. But as it turns out, it’s really not that scary. It’s simply a tool that helps you set up and manage your raw Linux box. It covers the stuff that comes before running Docker, like for example installing Docker. I’m sure there millions of advanced use cases for Ansible, like managing entire fleets of servers but what I am using it for is only the initial setup of my VM. Steps that I would typically do manually once I first login to the VM: setting up users and installing packages in particular. The benefit of doing it via script (as opposed to manual) is that it’s repeatable, versioned and documented in code. So when I decide to move a project to another hosting provider I can simply reconfigure a new server address and launch a new environment within seconds. I typically use a version of this playbook which sets up a Linux environment with Docker ready to use and basic security precautions applied (firewall, automatic updates, disabled password login, etc.).
Additionally, I’m making use of Ansible Vault which allows you to encrypt files (like .env files containing secrets) so that they can be checked into git. The files can then be decrypted by the deployment pipeline using the Ansible Vault Github action.
Github actions for CI/CD
CI/CD has never been easier than with Github actions. It’s so dead simple I’ll just post a deployment workflow config and it will explain itself.
name: Build + Deploy
on:
  push:
    branches:
      - master
jobs:
  build:
    name: Build
    runs-on: ubuntu-latest
    steps:
      - name: 1) Checkout
        uses: actions/checkout@v2
      - name: 2) Set up JDK
        uses: actions/setup-java@v1
        with:
          java-version: 11
      - name: 3) Build Java
        run: mvn package
      - name: 4) Build + push Docker image
        uses: docker/build-push-action@v1
        with:
          username: ${{ secrets.DOCKER_USERNAME }}
          password: ${{ secrets.DOCKER_PASSWORD }}
          repository: some/docker-repo
          tag_with_ref: true
      - name: 5) Restart application
        uses: garygrossgarten/github-action-ssh@v0.6.3
        with:
          command: cd /srv/app && docker-compose pull app && docker-compose restart app
          host: 123.123.123.123
          username: automation
          privateKey: ${{ secrets.SSH_PRIVATE_KEY }}
Alright alright, I’ll explain a bit: This workflow runs the following sequence of steps when a push on master happens:
- Checkout the code
- This is a Java app, so setup a Java environment for building
- Actually build the application with Maven
- Build a Docker image containing the previously built artifact and push it to Docker Hub
- SSH into the server, pull the new image and restart the application